skip to main |
skip to sidebar
 Two years ago, I had no place in my heart for tomatoes. With the stiff, pale burger-garnishes in mind, I wondered how anyone could get excited about them.
Then a few potted tomato plants in the backyard taught me how much heat they need to mature. Once they started to fruit, the woman next door was in awe, as not thirty feet away she had tried to grow tomatoes to no avail. We decided it was the exposed, south-facing cement wall behind my plants, storing heat during the day to pass to the tomatoes at night, that let them flourish. After harvest, I built a special room in my heart for tomatoes, the demanding plants that grow best in greenhouses and small anomalous corners of backyards. They are a luxury, and the crown of the late-summer harvest.
In Edmonton, it's hard to acquire the amount of tomatoes that necessitates preserving. However, for several years my mom has been taking advantage of a boom and bust greenhouse production cycle. She buys from a greenhouse that only produces in summer months, so come September they have a windfall of beautiful tomatoes that are dirt cheap. She's able to buy 40lbs of romas for $20.
Oven Drying
I keep expecting preserving to compromise the eating-quality of fresh ingredients. But, as with other preserves like jam and pickles, I'm left with a fantastic pantry item with an intense, focused flavour. In fact, I think I enjoy oven-dried tomatoes more than fresh ones. The process evaporates moisture to concentrate flavour and acidity, and gently caramelizes some of the sugars. These tomatoes are dynamite in pasta or tapenade, or just on a plate with garlic sausage.
Cut the romas in half and remove the juice and seeds. Strain this mixture and reserve the juice, either to drink or to use in canning (see below). Toss the flesh of the romas in oil, salt, and pepper. Go easy on the seasoning, as the tomatoes will reduce to a fraction of there original mass. Place the tomatoes on a sheet pan lined with parchment or silicon, and put them in an oven on low heat, maybe 200F. Not trusting the thermostat in my oven, I have a high-temperature thermometer clipped to the oven rack. I have to set my dial below 150F to achieve 200F. Leave the tomatoes for several hours, until they develop a dense, chewy texture. This year mine took about twenty hours. Packed in oil they will keep for months.
Canning
Authorities like Bernardin and the USDA say that the pH of tomatoes is on the cusp of acceptable acidity for canning. As such they recommend the addition of lemon juice to the canning liquid, about two tablespoons per quart. From a flavour standpoint, this makes me cringe. I have, however, read testimonies of people who grew up on tomatoes canned without any acid supplements.
I wonder if, since the pH walks the line of food safety, I could give it a bump in the right direction by slightly reducing the tomato juice we can with. Some water boils off, leaving a higher concentration of acidity.
As this was my first year canning tomatoes, I tried a bunch of different recipes. All started by blanching, shocking, and peeling the tomatoes. Then I canned some in water, some in tomato juice, some with lemon, some without, some with herbs and salt, some without.
 I just finished my first batch of dry-cured sausage. It is essentially fresh ground pork, stuffed into casings with nitrate and seasonings, then left to dry. The temperature and humidity have to be just right for the sausage to dry properly. I experimented with climate-control when making pancetta this past spring. In that case the meat had already been cured in my fridge, and the drying was just to change the texture. The pancetta was also cooked before eating. This is a whole other ball game, as these sausages aren't cured in the fridge beforehand, and aren't cooked before eating.
Dry-curing is an interesting process. With most charcuterie preparations, there are easily-described visual indicators to guide you along. For instance, when grinding meat, you look for a clean extrusion from the die, with each stream of ground meat remaining distinct from its neighbours. If the streams smear together in globules, either your meat and fat are too warm, or perhaps the grinder blade has collected connective tissue and needs to be cleaned. When dry-curing, you have to rely on subtle changes in the feel of the meat. The textures and densities are hard to describe to the beginner.
Given the mysterious and temperamental nature of the process, I'm sure most charcutiers take thorough notes on temperature, humidity, and the feel of the meat at each stage of curing, though they don't seem to share these notes very often.
On the contrary, charcutiers are legendary for their secrecy. Some examples:
- "Good charcuterie recipes are as closely guarded as family secrets. As a young cook in Moissac, France, I had to spy and even participate in the killing of my neighbor's pig just to get his pâté recipe." Eric Ripert, in a review of Ruhlman's Charcuterie
- "He seemed less than happy about aiding us, probably because he was having second thoughts about letting go of his family's priceless boudin noir. After both Fred and I again pledged that we would not publish a recipe giving exact quantities, he relented, remaining slippery on only one or two matters." Jeffrey Steingarten, It Takes a Village to Kill a Pig
- This ridiculous article, succinctly titled, "Chefs become experts at charcuterie thanks to secret website"
Here are some basic notes on my first attempt, notes that I hope to elaborate as I do more curing.Preventing Case Hardening
According to my humidity meter, the curing room was at 65% humidity, which is very good (though 70% would be ideal). I slowly developed a mistrust of this hygrometer, as over the first two days of curing the casings dried out completely. During this period, the casings should be a little tacky if you run your thumb over them. My casings were dry and smooth, offering no moisture-indicating friction when rubbed. To prevent the outermost parts of the sausage from hardening and trapping moisture within, I started misting the sausages with water a couple times a day. I did this from about day three until day seven.
Judging Doneness
I'm kicking myself for not weighing the links before I hung them up, because a good indicator of doneness is when the sausages have lost 30% of their weight. I was left squeezing the sausages every day, trying to decide when they were done. After three weeks they still had a slight give in the centre. A few more days and they were stiff throughout.
Preserving Shape?
When the sausages were first hung they were shaped like any other fresh sausage, cylindrical and tightly packed, the casings pulled taut. As the sausages lost moisture, they did not shrink uniformly into slender cylinders, but shrank in only one dimension, forming an elliptical cross-section instead of a round one (see photo below). Made for a very "rustic" product. The shrinkage patterns don't seem to be related to how I hung the sausages. I wonder if there is a way to control this.

A few of the many wild edibles that are in season:
Highbush CranberriesHighbush cranberries are traditionally picked after the first frost, when they are said to be sweetest. I don't know if the freezing temperature itself does something to sweeten the fruit, or if it's simply that waiting until the first frost gives the fruit the longest possible time to ripen and sweeten.
Cool, cloudy summers like the one we've just had yield berries with more acid and less sugar. Even so, the berries will still be good, so go pick a handful to save for Thanksgiving dinner. ChokecherriesCornucopic clusters of chokecherries hang along the trails of the river valley this time of year. The ease of picking is counteracted by the relatively low yield of usable fruit: there is after all a large pit in each cherry (hence the name..) A food-mill with the right sized plate will separate the flesh from the pits. Chokecherries are extremely astringent, and make a superb fruit wine.
 RosehipsThe fruit of roses.
A quick digression: I've often wondered why rosewater hasn't become an Albertan specialty, given the provincial association, the omnipresence of wild roses, and how easy it is to make.  JuniperI've pondered for some time whether the low-lying juniper planted in front lawns (Juniperus horizontalis) is edible, like its cousin Juniperus communis. I recently decided to stop wondering and start eating. These berries rarely seem to get as dark blue and fleshy as those sold at the grocery store, but they still taste fantastic, especially with game and sauerkraut.
 Fairybells
When Lisa and I started noticing these bright, matted red berries, we thought for sure they were poisonous. Turns out they're not. The berries and the root of this plant taste uncannily like watermelon.
 Mountain Ash (Rowan)I always assumed that mountain ash berries were inedible. They stay on the trees through the winter, and I figured that if the birds don't eat them, people probably shouldn't, either. Then I stumbled over the entry for rowanberry in Larousse: "An orange-red berry the size of a small cherry. It is the fruit of the mountain ash tree, a species of Sorbus. The berries are used when almost overripe to make jam or jelly (good with venison) and, on a small scale, brandy. They have a tart flavour."
As with the juniper, I worried that Edmonton had a different, inedible species of Sorbus. Then, after a certain botanist assured me they were safe, I started eating them. They're sour, and kind of taste like rhubarb.

 Cucumbers
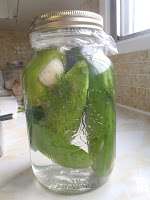
I come from a land of "refrigerator pickles": cucumbers steeped in syrupy vinegar and spices, and stored in the fridge through the fall. The idea of producing an acidic pickle with only brine was a revelation.
The procedure couldn't be simpler. Make a brine of one cup salt in one gallon of water. Cover your chosen vegetables in the chilled brine (most vegetables want to float, so you'll have to find a way to keep them submerged) and leave for a week at a cool room temperature. This is the only tricky part: the solution must stay below 23°C to prevent the proliferation of harmful bacteria. I don't have any air-conditioning, so I wait for weeks like this, when it barely reaches 20°C outside, and then crack open the window in my "cold storage room" (also my office, where I am typing this post).
The familiar Lactobacillus bacteria consume something (lactose?) in the vegetables and create lactic acid. Lactobacillus can survive in the saline solution, while most undesirable bacteria can't.
Once the vegetables have reached the desired balance of salty and sour, they are removed from the brine and placed in a new container. The brine is boiled to kill off any pathogens, then chilled and poured back over the vegetables. The pickles will keep indefinitely in your fridge.
That is my only misgiving about this preservation technique: the pickles are not properly canned, and so they tie up fridge space. The bulk of my cucumbers are cooked into syrupy relish, properly canned, and kept in the pantry. It's worth saving a few vegetables for this natural pickling process. The taste is exquisite: delicate acidity and a high crunch-factor.
Cabbage
We're starting to get 5lb heads of cabbage from Tipi Creek. While I have a gargantuan appetite for braised cabbage at this time year (apples come into season, I smoke pork, maybe there's some kohlrabi kicking around...) there's still plenty left over to make sauerkraut by the traditional brining method. This year I tried canning my sauerkraut. Sauerkraut is often cooked before eating anyways, so I figured it will hold up to the canning process nicely.
There's still a nagging voice in the back of my mind, a voice insisting that canning without a recipe is dangerous.
I need a book that liberates me, the home-canner, from recipes. A book that says: "This is the pH, salinity, or sugar content required to safely jar food. This is how to measure the pH of your pickles. This is the approximate pH of common household pantry items. This is how to calculate the pH of your pickling solution." That way, instead of working from a recipe, I could start with a set of ingredients or cured products like sauerkraut and salt pork and test and adjust them to make sure they're safe to can.
Even though I didn't have a recipe for the canned sauerkraut, there are plenty of forums and Youtube videos from the northern US that detail the jarring of traditional home-cured sauerkraut. All the folks in these videos have friendly, trustworthy faces, so I gave it a go.
This week I made a pâté dish featuring two products from Greens, Eggs, and Ham. The main component of the pâté was duck livers from unfattened ducks (ie. not foie gras, just normal livers). The pâté was then served with sour cherries from the same farm (several of which are apparently languishing, unpicked, for want of labourers).
Pâté is a dish that suffers from misunderstanding because of the highfalutin language surrounding its preparation. A pâté is a glorified meatloaf: it is ground meat that has somehow been bound together. That's it.
Within that definition, there is a spectrum that runs from "rustic" to "refined". The two qualities that decide a pâté's place on the spectrum are texture and ingredients. Rustic pâtés are coarser in texture and made with cheaper, heartier ingredients, like liver. They are often described by words like campagne ("country"), grandmère ("grandma"), and maison ("house"). Refined pâtés have a finer, creamier texture and feature meat more prominently than liver. The following pâté is on the far rustic end of that spectrum, as it is coarsely ground and is mostly duck liver, with a bit of pork shoulder.
The recipe was adapted from that for pâté grandmère in Michael Ruhlman's Charcuterie. Duck livers can generally stand in for chicken livers.
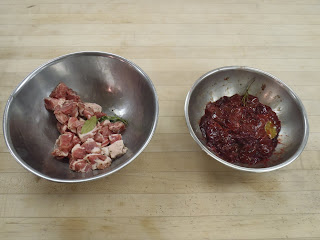
1: Season the pork and liver (separately), with salt, pepper, bay, and thyme. Leave the mixtures overnight in the fridge.
 2: The next day, chill the meat grinder and mixer parts. Ice water is particularly effective. You can also preheat your oven to 300F.
 3: After removing the bay leaf and thyme, sear the livers quickly over high heat. This is done strictly to enhance flavour and colour. Remove the livers from the pan and add minced shallots. Sautée briefly, then deglaze the pan with brandy to capture the sweet, sweet fond. Add the shallots and brandy to the livers and chill the mixture thoroughly.


 4: Searing the livers reduces the meats' willingness to bind and form a cohesive pâté. To help the liver and pork bind properly, a "panada" is added. This is exactly equivalent to the egg and bread crumbs our moms add to meatloaf or hamburgers. This panada is made of milk, cream, egg, and crustless white bread. Simply mix all the ingredients together with a fork.

 5: Once the liver mixture is thoroughly chilled, combine the pork (bay and thyme removed), liver mixture, panada, and parsley, then pass through the meat grinder with a coarse plate. The plastic wrap in the picture below is draped over the grinder plate to prevent splatter (the livers are still bloody inside).
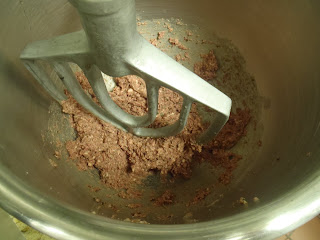
 6: Mix the pâté. This develops a protein called myosin that gives the pâté a firm texture. Mix until the pâté develops a slightly sticky feel.
 7: Quenelle test. Fry a small sample of the pâté to make sure it's properly seasoned. Since the pâté will be served at room temperature, the seasoning of the fried meat should be aggressive, but not overpowering (seasoning is easier to detect in hot food...)
 8: Shape and bake. A pâté like this would traditionally be packed into a terrine lined with plastic wrap, like the one below:
 At the last minute I decided to bake my pâté in individual ramekins. Regardless of your cooking vessel, pack the meat tightly so that there are no air bubbles. Cracks and pocks mar the presentation, especially in smaller molds.
Place your ceramic vessel in a high-sided roasting tray. Fill the tray with hot water, up to the the level of the meat. I covered my pâté with plastic wrap with the idea of inhibiting browning and moisture loss, though I'm not sure it did anything.
 Cook in a low oven. For standard terrines, 300F is ideal. Since my pâtés were so small, I lowered my oven to 250F so that they would cook gently, and slowly enough that I could monitor them and pull them out at just the right time.
The internal finishing temperature should be about 150F. With a standard terrine this is easily measured by a digital thermometer. Unfortunately a thermometer would not work with these small pâtés. Most digital thermometers detect heat more or less along the whole length of their probe (or atleast the first couple inches). My pâtés, being only an inch deep, would not offer reliable measurements. I judged the doneness the old fashioned way: gently poking the surface of the pâté to test the firmness of the meat. Also, the pâté will be just, just starting to pull away from the sides of the ramekin once the meat is cooked.
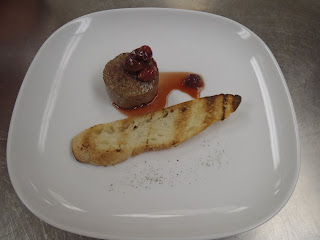
9: Serving. I popped the pâtés out of their ramekins and seared them in a hot pan. This is emphatically not traditional, but the liver takes well to the browning flavour, and the crust is a good contrast to the creamy interior. Plus the sear reminds me of Mom's meatloaf.
The sauce was just sour cherries and simple syrup. Serve with toast.
Potatoes? You gotta be poor to eat potatoes. Real poor.
-Tuco Ramírez in The Good, The Bad, and The Ugly
The importance of potatoes to my family was a slow revelation. I always knew from off-hand, quietly resentful remarks that when my parents were young they spent a lot of time tending to potato patches. Only recently did I fully understand the role potatoes played in their lives.
We usually consider bread to be the embodiment of simple, gratifying food. References to bread in European history, mythology, and religion are too numerous to count, but here are some highlights. Ample supplies of bread have often been the foundation of political stability. During the long period of decline, Roman emperors are said to have placated the masses with "bread and circuses," that is, by giving away bread and hosting spectacles like the gladiatorial fights. On the other hand, bread shortages incited riots during the French Revolution, which prompted Marie Antoinette's infamous proposal: "Let them eat cake". The Bible is replete with references to bread, where it is the main symbol of bodily nourishment. The two most notable references are in the Lord's prayer ("Give us this day our daily bread") and the breaking of bread during the last supper before Christ's death, which became the central sacrament of the Christian faith, in the form of communion.
Potatoes, being native to America, were unknown to Europe until the sixteenth century, weren't widely eaten there until the nineteenth century, and even then were considered peasant food. They don't have the benefit of biblical references, to say the least.
My parents grew up on farms in Ontario, and while they baked bread at home, potatoes were the staff of life. My mom ate potatoes twice a day almost every day of her childhood, usually fried potatoes with lunch and boiled potatoes with dinner.
 Her family grew them in huge quantities to last the winter. They were stored in the cool basement in crates with three solid walls and a fourth wall made out of slats stacked and held in place by grooves. The potatoes were sprinkled with lime (the chemical, not the fruit) to prevent rot.
With this in mind, I have a dish to celebrate the potato: a dish befitting the nourishing, comforting, hearty character of the tuber. This ain't duchess potatoes or Vichysoisse. I'm talking about a potato broth with dumplings.
Potato Broth with Dumplings
Conversations about potato dishes usually focus on texture (the ideal French fry has a crisp exterior and fluffy interior, the ideal mashed potatoes are smooth but not gummy...) I love this broth because it makes you think about how potatoes taste. Potato skins are used to infuse a vegetable broth with potato flavour, without any of the thick starchiness we associate with potato soups.
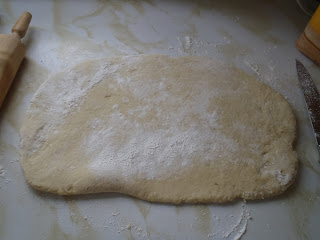
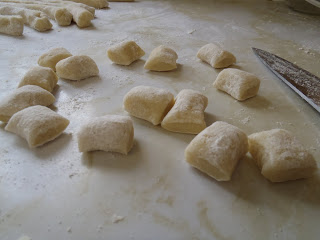
Start with the dumplings. The key to pillow-like potato dumplings is to have as little moisture in the potatoes as possible. This way the milled potatoes will require less flour to form a dough, and there will be accordingly less gluten in the finished dumplings. Use low-moisture, starchy potatoes like russets.
Boil or bake the potatoes whole, with the skins on. Once they are cooked through and still hot, peel away the skins in large segments and mill the potatoes. Clouds of steam will escape in the process, ridding the flesh of excess moisture. Spread the milled potatoes on a sheet pan and cool thoroughly to let a maximum of moisture evaporate.
Lay your potato peels on a rack and dry thoroughly in a warm oven.

Once the potatoes have cooled, add flour and mix until a dough forms. To shape the dumplings, roll the dough flat, cut into strips, then cut the strips into rectangular pillows.


Now the broth. Make a simple vegetable broth by sweating onions, carrots, celery, and a touch(!) of tomato for colour and acidity. Add parsley, bay, and pepper. Cover with cold water and simmer for about an hour. Strain out the vegetables.
Add the crisp potato peels to the vegetable broth and simmer until you can taste the potato and the broth has reduced to a flavoursome concentration. Remove the peels before serving.

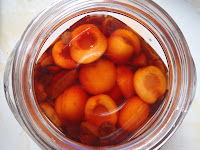 Rumtopf, literally "rum pot", is a traditional German fruit preserve. As each type of fruit comes into season, it is macerated with sugar, placed in the pot, then covered with rum. Traditional rumtopfs are earthenware pots with heavy lids, but any wide-mouthed, non-reactive vessel can be used.
Earlier in the summer I added the precocious BC fruits, mostly cherries and apricots. This week I can add u-pick raspberries and strawberries.
I use about one part sugar to two parts fruit, by weight, for each addition.
The finished mixture steeps for a few months, and is usually eaten around Christmas. The fruit can be spooned over, say, ice cream, cake, or waffles, and the liquor can be drank on its own.
Every time I take off the lid to add more fruit I'm clubbed in the face with the delicate perfume of spiced rum and apricots. It's the height of folly to say this in the midst of our fleeting summer months, but I can't wait for Christmas.

 Two years ago, I had no place in my heart for tomatoes. With the stiff, pale burger-garnishes in mind, I wondered how anyone could get excited about them.


