Monday, October 31, 2011

Eating a Jack-o-Lantern

Two ways I eat my jack-o-lantern.

First, when hollowing out the pumpkin, I save the seeds.  A nifty trick for separating the seeds from the stringy pumpkin guts: throw the whole mess in a large pot of water.  If you rub the mass between your hands, you loose the pumpkin flesh from the seeds, which float to the top and can be easily skimmed off.  Dry them on a bake sheet lined with paper towel overnight, then toss with oil and seasoning and roast until golden brown.

Second, in years past, after the trick-or-treaters have stopped calling, I've taken my jack-o-lantern off the step, cut it in half, and roasted it in the oven.  Eating quality of carving pumpkins seems to vary, but most of the time the flesh tastes good, and can be puréed and converted to pumpkin soup or pie.

Sunday, October 30, 2011

Back Bacon

In the States this preparation is called Canadian bacon, but we usually call it back bacon.  It's more or less the same process as regular bacon, only done to a section of the loin instead of the belly.  There's an old style of back bacon from eastern Ontario called peameal bacon, in which a cured section of loin is rolled in peameal (crushed split-peas) before being smoked.  Peameal bacon is still made down east, though nowadays cornmeal is used.

Back bacon is usually made from the eye of loin: the large, round muscle often made into centre-cut pork chops.  You can also use the rib- and sirloin-ends of the loin, which have more fat and flavour than the centre.  I tried the classical eye of loin.

First the loin must be cleaned.  There is a band of meat and fat called the chain (in the top right corner of the picture below) that must be cut out, but can be reserved for ground meat.  There is also some fat and silverskin (top left) that can be removed and discarded.  I cut my cleaned loin into three sections so that it could fit in my curing bucket.


The main procedural difference between back bacon and belly bacon is that back bacon is usually brined instead of dry-cured.  My brine consisted of salt, curing salt, brown sugar, herbs, and a halved, squeezed lemon.  I used a ceramic plate to keep the meat submerged.


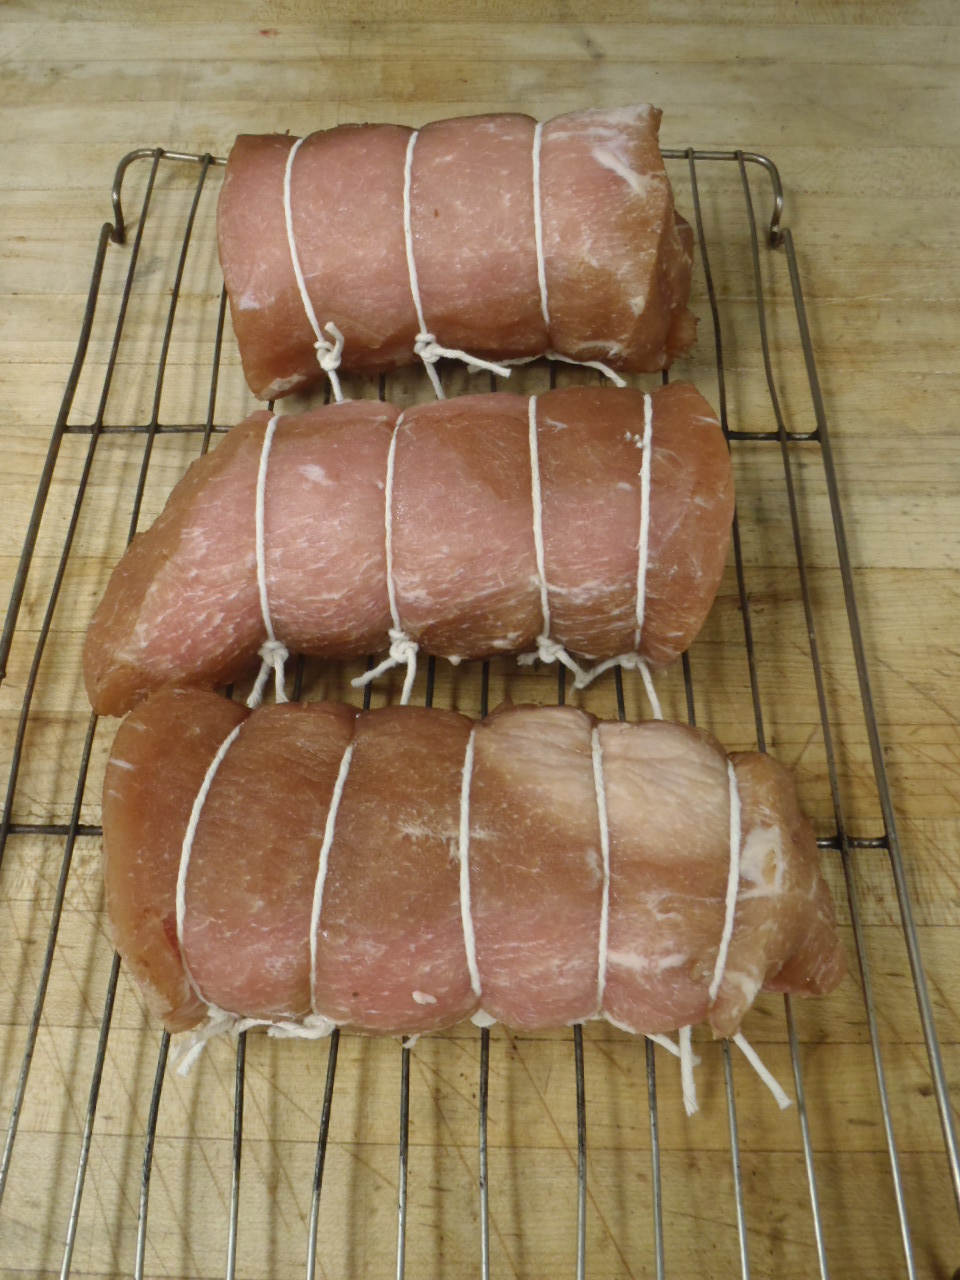
After sitting in the brine for a few days, the eye of loin is tied so that it will have a round cross-section.  In the picture below you can see three different colours on the meat: there are brown parts, pink parts, and a light grey part.  The cure, having lots of brown sugar, is responsible for the brown areas.  The pink sections are where the loin sections were either pressed against each other, or resting on the botton of the container.  The grey circle on the bottom is actually a piece of meat that was cooked by the acidity of the halved lemon.

When curing with dry rubs, you have to "overhaul" the meat: rub it down every couple of days to redistribute the cure.  I guess the same should have been done for this brine.  At the very least the loin sections should have been rotated so that the surfaces got even exposure to the brine.  This is mainly an aesthetic issue, as the meat seems to have cured properly.


Next the loin is hot-smoked to an internal temperature of 65°C.  This is the most critical part of the procedure.  Since the eye of loin is an extremely lean cut, over-cooking will produce dry meat.


Here is the final product.  The curing salt in the brine has given the meat a rosy colour. 


The most important thing to remember when eating back bacon: it's not belly bacon.  It's not the fatty slab of crazy pleasure that you might be used to.  That being said, back bacon still has its place.  If it's brined and cooked properly it is by no means dry.  The smoke and herbs balance the piquancy of the curing salt.

Friday, October 28, 2011

Bath Chaps, Revisited

The first course of Button Soup's February Pork Dinner was cold-cut Bath chaps: a boned-out pig's head, cured, rolled around the tongue, tied, poached, and sliced.   While I was extremely happy with the look of those Bath chaps, they were pretty bland.  I figure that the cure leached into the poaching liquid.

I had another go at the chaps with this fall's pig.  This time, instead of using a whole head, I used only one jowl, cured, and wrapped around the tongue.

After rolling and tying, I seared the meat over high heat.  Once chilled, I vacuum-packed the chaps and simmered them for two or three hours.  This was not proper sous-vide: though the meat was vacuum-packed, it wasn't cooked in a low-heat, temperature-controlled bath.  A good hunk of fat rendered from the chaps, and some insanely flavourful jus leached out.  The plastic seal definitely helped the meat retain its cure.  The final plate was very flavourful, strong of garlic and herbs and brown sugar and salt.

I think that the vacuum-packing also helped bind the tongue and jowl together.

Obviously the presentation of these chaps isn't as striking as that of the whole-head chaps.  If I try tongue-and-cheek chaps again I'll trim the jowl to a uniform thickness.  You can see that the left side of the chaps, below, is thicker.  Trimming that down would give a more balanced presentation, and maybe even let the jowl wrap all the way around the tongue.

Wednesday, October 26, 2011

Scrunchions


These are scrunchions.  They're a bit like pork rinds.

"Pork rind" simply means pork skin.  It can refer to the fresh, raw skin cut from a side of pork, but more commonly it means pig skin that has been rendered and fried crisp.  It is actually the same as crackling, though commercially-produced pork rinds are much more delicate than the crackling that develops on oven-roasted pork.

Scrunchions are made by a similar process, but they're made of raw pork fat, not skin.  I can't figure out how frying pure back fat results in a crisp product, but it does.  Scrunchions are one of the finer components of Newfie cuisine, along with chow-chow, screech, and saltfish.

Like so many kitchen preparations, the snack pictured above was a happy accident.  I had not planned on making scrunchions that day.  Rather, I was cooking a large rib roast.  My haggard butchery had left a slender flap of back fat hanging off the roast in the dry heat of the oven.  Part way through the roasting I realized that this flap had crisped into a scrunchion, so I cut a number of slices of fat from the roast and left them on the wire rack beside the meat.

Once crisp the scrunchions were removed to a paper towel and sprinkled with sea salt and chopped thyme.


How to Make a Paper Cone for Scrunchions

This is also how pastry cooks make impromptu piping bags from parchment paper.

Cut a 8" x 8" square of parchment paper.  Cut the square into two right angled triangles.  Orient one of the triangles so that the hypotenuse is towards you, like so:


Roll the bottom left corner so that its tip meets the tip on the top centre:


Now roll the bottom right corner around the cone, so that its tip meets the other two.


You should be able to pinch all three corners:


Fold the three corners down.  Fold them once more to secure the cone.


The cone should now hold its own shape, without the use of tape.

Monday, October 24, 2011

October Kills its Pig

Everybody rejoices when November kills its pig.
-an inscription on the Münster Cathedral


Edmonton gets cold enough to butcher outdoors a bit sooner than Westphalia, so our version of the inscription would have October killing the hog.

This year Lisa and I bought a side of pork from Nature's Green Acres.  I cut up our meat at Kevin's, on what he and his family call Pig Day.  While the majority of the pork was wrapped and frozen, there was also some curing, smoking, and grinding, processes that have come to typify the season.


Brine-Curing

Processing a side of pork is made less daunting by the presence of a brine bucket.  Certain pieces can go straight from the cutting board to the brine, making for less wrapping, labelling, and freezer management.

There are two types of brines. The first contains only table salt and other flavours like brown sugar and herbs. Salt is absorbed into the meat so that it is seasoned throughout its mass, and not just on the outside. The meat will retain more moisture during cooking. I call this a "seasoning brine."  This is a relatively quick process: I might brine a thick pork chop for four hours before cooking it.

If sodium nitrite is added to the brine, some additional, complex chemical changes occur. The meat develops a vibrant pink colour and a piquant flavour. I call this a "curing brine," to contrast it with the seasoning brine explained above. The curing brine takes longer than the seasoning brine.

Seasoning brines are typically made the day that you cook the meat. Curing brines can be started the day that the pig is fabricated.  Cuts that are typically brine-cured include hocks, hams, eye of loin (Canadian bacon), and the tongue.


Dry-Curing

Other cuts are better cured in a dry rub.  This is especially true of fatty pieces like the jowl and the belly.  These cuts get mixed with the dry cure (salt, curing salt, sugar, herbs), then bagged and left in the fridge for a week, after which they are rinsed and either air-dried or hot-smoked.


Grinding Meat and Making Sausages

When I first started cutting my pig, I assumed that all the trim would supply ample meat and fat for grinding. This may be true of professional butcher shops that produce portion-controlled chops with clean bones, but when the pig is separated mostly into large roasts, there is actually very little trim.  A portion of the shoulder must be specially reserved for ground meat.  I shoot for a 3:1 ratio of meat to fat.

I store my ground meat in three forms. First there are one pound bags of ground pork, unseasoned, ready to be made into patties or pie filling.  I also find it handy to freeze some loose ground pork that has already been seasoned and spiced.  Finally there are sausages.


Making Stock

Even with many of the bones staying in roasts (the hocks, trotters, rib roast, hams...), there are still plenty left to make stock.  Sections of the backbone, as well as the riblets, skull, tailbone, shoulder blade, and arm bone are lightly smoked on the barbecue, thrown in a pot, covered with cold water, brought to a boil, then simmered for twenty four hours.  The next day I add the vegetables and simmer for an hour, then the herbs, which are simmered for fifteen minutes.

Finally the stock is strained and cooled, then frozen into ice cube trays so that it can be used a little at a time.


Rendering Fat to make Lard

We keep a lot of fat on the roasts and steaks, so we set aside a section of back fat especially for rendering.  There is also the leaf lard, the brittle fat around the kidneys, analogous to the suet in sheep and cows.  All the fat is thrown in a heavy stainless steel pot with bit of water and put over very, very low heat.  The water helps distribute the heat in the early stage of the rendering.  Eventually the water evaporates, but by that time enough fat has melted to serve the same function.  I typically leave my fat on the stove overnight.

Sunday, October 23, 2011

Turkey Stock

The October installation of the Button Soup Supper Club was, predictably, a Thanksgiving turkey dinner.

Instead of roasting the entire turkey, I have been cutting the fresh bird into two suprêmes (breasts with the drumette still attached) and two leg-thighs.  There are many reasons for this.  With the remaining carcass I can make a stock to be used at the same dinner as the meat.  With the bird broken up into smaller pieces I can sear them to jump-start the browning.  Each piece can then be removed from the oven at the proper temperature (165°F), which happens at different times for different cuts.  Also, the turkey cooks in under an hour, which makes our Thanksgiving timeline less stressful and more flexible.

Lisa objects to this method. She feels that the presentation of a whole roasted bird at the table, and carving that bird in front of the guests, are indispensible parts of Thanksgiving.  I too appreciate the pageantry of tableside carving, but I think the above gastronomic benefits trump Thanksgiving ritual.

Saturday morning we pick up the turkey from the Four Whistle truck at Old Strathcona.  That same morning we cut up the bird and get the meat into a brine.  We use a basic brine of salt, brown sugar, and sage.  Then it's stock-making time.

I've recently tweaked my stock-making method.  According to Professional Cooking for Canadian Chefs (the text that journeyman cooks and red seal chefs study), for optimal flavour poultry stock should simmer 2 hours, while vegetable stock should simmer for 45-60 minutes.  If a vegetable stock has its best flavour after only an hour of simmering, why would I add vegetables at the start of a poultry stock?  Why not add them only for the last hour?  Even better examples of this principle are black pepper and herbs, which release their best flavour after only fifteen minutes of simmering.  If you add herbs at the beginning of a stock, by the time you've extracted the flavour of the meat and the gelatin of the joints, what little herb flavour remains will be muddy and muted.

I also take exception to the recommended simmer-time for bones.  A passable broth can be achieved after a couple hours, but a superlative stock takes at least twenty four.  I've found the right setting on my stove-top so I can keep the stock very low, barely even steaming, and let it sit unattended overnight.  I know that would make some people nervous, but I've done it countless times without issue.

Here's my complete turkey stock method.


Turkey Stock

Ingredients
  • carcass of one 10-15 lb turkey, including neck, gizzard, and wingtips
  • 1 large onion
  • 2 ribs celery
  • 2 carrots
  • 1 small head of garlic
  • 3 bay leaves
  • roughly 2 cups dry cider
  • roughly 6 L very cold water
  • 1 bunch thyme
  • 1 bunch sage
  • 1 bunch parsley
  • 5 black peppercorns, crushed

Procedure
  1. Roast bones in a heavy pan at 350°F until thoroughly browned. Remove and set aside.
  2. Roast the vegetables in rendered turkey fat until browned. Remove a reserve for later use.
  3. Pour any excess fat from the pan.  Deglaze the pan with the dry cider and reduce au sec.
  4. Put the roasted bones and the cider reduction in a stock pot and cover with cold water. Bring to a boil then simmer very gently for 24 hours.
  5. Add the roasted vegetables to the pot. Return the liquid to a boil and simmer gently for 2 hours.
  6. Add the herbs and peppercorns.  Simmer gently for 15 minutes.
  7. Strain the mixture and chill thoroughly.  Once chilled, remove any fat from the surface of the stock.
Please, please save the abovementioned fat and fry something in it.  Here's an idea:


Turkey Gravy
Ingredients
  • 1/4 cup turkey fat, either from the roasting pan, or reserved from the chilled stock
  • 1/4 cup all-purpose flour
  • 1/2 cup dry cider
  • 1 L turkey stock
Procedure
  1. Deglaze the roasting pan with the dry cider.  Reduce the cider to 1/4 its original volume.
  2. In a separate pot, combine the fat and flour.  Cook out the flour for about 5 minutes.
  3. Stir the cider and stock into the roux.  Adjust seasoning and consistency.

There are a few other ingredients that weave their way through multiple courses of our Thanksgiving dinner.  This time of year we are awash in dry apple cider, which played the roles commonly reserved for white wine: deglazing pans, augmenting acidity, and consuming in vast quantities while preparing dinner.   Squashes formed the bookends of the meal: we started with Hubbard squash soup, and finished with pumpkin pie.


Thanksgiving Addendum: Rumpot Update

We had our first taste of the rumpot at Thanksgiving, to see how it is developing.  The pot of preserved evans cherries is fantastic.  It smells of almond extract.  The acidity of the fruit is rounded by the sugar and rum.  I'm only making single-fruit rumpots from now on...

Saturday, October 22, 2011

Notes on Baking Bread

Even once I had a handle on basic techniques like dough-shaping, I found that the bread I made at home wasn't as good as the bread I made at NAIT, where they have commerical equipment like proofing boxes and deck ovens.

Here are some quick notes on using household kitchen items to replicate the equipment in professional bakeries and bake better bread.


Proofing

I've always felt that my bread doesn't proof as well at home as it does at school.  At first I thought this was a temperature issue, so I tried fermenting and proofing my bread in increasingly warmer corners of the house.  Turns out humidity was the more important factor.

In commercial kitchens bread is proofed in proofing boxes.  These are fridge-sized compartments that are temperature- and humidity-controlled.  They stay between 20°C and 30°C, the temperature range at which yeast is most active, with a relative humidity of about 70%, which prevents a dry skin from forming on the dough.

I do my proofing in a cold oven, because it is an enclosed, draft-free space.  To mimmic the humidity of a proofing box, I tried scalding a small pot of water, putting it on the bottom rack of the oven, then proofing my dough in a lightly greased casserole on the top rack.  The pot of water releases vapour, and gently warms the air in the oven.  With the added humidity, the dough develops the ideal soft, tacky feel.  Success.


Baking

Whether you're searing a steak, sautéeing mushrooms, or baking a loaf of bread, you're trying to balance the desired doneness of the interior with the desired doneness of the exterior.  For steak, we want a heavily caramelized crust on the exterior, but pink, mid-rare flesh on the interior.  We apply very high heat to develop the crust before the interior is overcooked.  If we applied the same high heat to a large roast, the exterior would burn before the interior was cooked.  For roasts we cook at a lower temperature so that the delicious brown crust is finished at the same time as the pink meat inside.

With bread we also want a deeply caramelized crust.  Besides simply cooking the interior of the dough, we also want to maximize something called oven spring.

As the dough heats up in the oven, the little gas pockets that developed during bulk fermentation and proofing expand greatly.  The yeast also has one last hurrah, binging on sugars and expelling carbon dioxide, but this does not account for nearly as much rise as the simple thermal expansion of gases.  The dramatic rise in the first few minutes of baking is called oven spring.

To maximize oven spring we heat the dough rapidly and evenly in a moist atmosphere.  The quick heating ensures that the air pockets deep inside the dough have a chance to expand before the exterior bakes.  The steam prevents the exterior from forming a crust, which would hinder spring.

To rapidly heat the dough, professional bakers use deck ovens.  The dough is placed directly onto a uniform stone or ceramic platform, called the floor or deck.

To mimmic the deck at home, I use a heavy sheet pan, inverted so that dough can easily slide on and off.  You could also use a baking stone.

Commerical bread ovens also have steam generators.  Immediately after the bread is placed on the deck, the baker injects steam into the oven.

To create a similar effect at home I was told by a few people to put a metal tray on the bottom of the hot oven, and to throw a handful of ice onto it after the dough has been loaded.  Using ice, as opposed to water, will supposedly lengthen the release of steam into the oven.

I find I get better oven spring by throwing boiling water onto the hot pan.  You get much more steam much faster.  Believers in the ice method say that the steam from boiling water dissipates before the oven spring is complete.  For my most recent batch, I put about three cups of boiling water onto the hot pan, and there was still a bit left when I pulled the bread out thirty minutes later.

Use a very heavy pan as your steam generator.  Thin aluminum pans don't hold much heat, and therefore won't create a lot of steam immediately.

My first time I used a Pyrex casserole.  It cracked.  Now I use a heavy stainless steel braising pot.

Sunday, October 9, 2011

How to Use Leftover Meat and Charcuterie

This is the single most useful preparation that I learned in Austria.  It's invaluable to establishments that use a lot of cured meat, but also a good trick to have in the home kitchen.

It's called fleischknoedl (approximately: "FL-EYE-SH KNUH-dl").  Fleisch just means meat, while knoedl is a type of dumpling that is popular in Austria and Bavaria.  Fleischknoedl is a fantastic way to use up leftover meat, whether cooked or cured.

Most cooks are familiar with how to use scraps of raw meat.  When butchering a side of pork, for instance, you reserve the miscellaneous bits of meat and fat so they can be ground and used in sausages and forcemeat.

There's also leftover trim when cutting cooked and cured meat.  Whether you're using a commercial meat-slicer or just a knife, there is usually an end piece that is not served.  This might be the slightly over-cooked end of a roast, or a dry end of salami.  Or perhaps the meat is just a few days old and you want to bring in fresh product.

Thankfully the Austrians have developed a way to use these leftovers.  They will keep the nubbins from roasts like schweinsbraten and kuemmelbraten, fresh sausages, and even dried sausages like kantwurst or hauswurstel. The meat is mixed with cooked onions, then ground, shaped into balls, surrounded with dumpling dough, and cooked.

While most North American homes will not go through as much cooked and cured meat as an Austrian bed and breakfast, there are still times when this preparation can be a life-saver.  I'm thinking especially of ham leftover from Christmas or Easter.

I recently made fleischknoedl from the roasts leftover after the Button Soup Canning Bee: a cured, roast pork shoulder, roast pork belly, and roast beef.  The recipe follows.


Fleischknoedl (Meat Dumplings)

Ingredients
adapted from Looshaus
  • 1 kg leftover meat (see Note 1, below), cut into 1" cubes
  • 250 g onion, small dice, cooked in a little oil until transluscent
  • 2 kg cooked potatoes, milled and chilled
  • 100 g all purpse flour
  • 330 g rice flour (see Note 2, below)
  • 4 eggs
  • 400 g melted butter
Note 1: A good mixture would be 3/4 cured, cooked meat such as ham, and 1/4 dry-cured sausages.  Fresh (un-cured) cooked meat like pork chops and roast beef give the mixture a mushy texture and should be used in moderation.

Note 2: The actual ingredient here is grieß, which most German-English dictionaries translate as "semolina."  The grieß they use at Looshaus is made from corn, though it doesn't have nearly as strong a corn flavour as the corn flour available in North America.  Any mild-tasting, low-gluten flour will suffice as a grieß substitute.


Procedure

Combine the meat and onions and grind using a small die.


Shape the meat and onion mixture into little balls about an inch across.  Put the balls on a sheet pan lined with parchment and freeze.


Combine all remaining ingredients and knead until a soft, tacky dough forms.  Do not over-knead.  Shape the dough into a log.

Remove the frozen meat balls from the freezer.  Cut a round from the dough and press a meat ball into it.  Work the dough around the ball to cover it evenly.  Repeat until all the balls are covered in dough.

You can now freeze these dumplings.


Traditionally fleischknoedl are boiled and served with warm cabbage salad.  They can also be breaded and fried for some textural contrast that (to speak like Guy Fieri) puts the dish over the top.

Saturday, October 8, 2011

Cold-Smoking Pickerel

Cold-smoking pickerel in my barbecueI recently picked up some pickerel from Rebekah's Fish at the Strathcona Market and took my first stab at cold-smoking on my barbecue.

To hot-smoke on my barbecue I just remove the grate from the righthand side and put foil packets of wood chips directly onto the flames.  I put the meat on the left side, which remains off.  This way the meat isn't over direct heat and will cook evenly.  With the right burner on a medium-low setting, the wood chips smolder and the average temperature inside the barbecue stays around 250°F.

The point of cold-smoking is to impart the flavour of the smoke without cooking the meat.  Examples of food that you might want to keep raw are cured fish, jerky, and certain types of cured meat like salami or speck.  To keep the meats from cooking the temperature has to stay below 100°F.  Barbecue burners are so large that no matter how low you set them, they will always produce enough heat to raise the temperature of the barbecue above 100°F.

The solution is simple enough.  I ignited my wood chips in a stainless steel pan on my stove top, then put the pan in the barbecue, where I usually rest the packets.  The barbecue remained off, and functioned only as a chamber to hold the smoke.

The major disadvantage of the pan method is that, without any active heat source, the chips only smoulder for about five minutes before they have to be re-ignited.

Properly curing cold-smoked meats is very important because they usually stay in the temperature "danger zone" for several hours.  The danger zone, between 39°F and 140°F, represents the temperatures at which microbes grow best.  Below this range they are inactive, and above this range they die.  In professional kitchens they say that any food that stays in the danger zone for more than two hours is unfit to serve.  When we cure meat we make the flesh inhospitable to microbes, and we can therefore keep it in the danger zone for extended periods.

Food safety aside, properly curing the fish makes the flesh firm, dense, and pleasantly salty.  Below is the recipe I used to cure my pickerel, though I have to caution that I've found fish-curing to be a fickle business.  I've tried the same recipe on different pieces of fish and had wildly different results.


Smoked Pickerel
adapted from Charcuterie

Ingredients
  • 850 g pickerel fillet in one piece, skin on, bones removed
  • 157 g kosher salt
  • 63 g dark brown sugar
  • 13 g crushed juniper berries
  • 20 mL whiskey
Procedure
  1. Mix the salt, sugar, and juniper. Spread half the dry cure in a container that will just fit the fish. Lay the fish, skin side down, on the cure. Pour the whiskey over the fish, then sprinkle the remaining cure over the fish. Try to get more cure on the thicker parts of the fillet.
  2. Cover with plastic wrap. Rest a flat board for pan on the fish, and top with a 500 g weight. Refrigerate for 20 hours.
  3. Rinse the cure from the fish. Pat dry with paper towel and let rest, uncovered, on a wire rack in the fridge for at least an hour.
  4. Cold-smoke with maple chips until desired flavour is achieved.

I served my smoked pickerel with green pea and wild rice crepes, and celery root slaw with grainy mustard dressing.

 Smoked pickerel with green pea and wild rice crepes

Saturday, October 1, 2011

Sunflowers: A Failed Experiment

When I was little I watched cartoons on Saturday mornings.

At one o'clock custody of the television passed to my mother, who watched Victory Garden, an American public television show that tours some of America's greatest gardens.

I hated this show.

Now that I'm all growed up, I rather like it.  A couple years ago I was watching Victory Garden when they interviewed a chef from Boston who used sunflowers like artichokes.  I filed this idea in the deeper recesses of my brain until this summer, when I came into some sunflowers from Tipi Creek.

I pulled out the flower petals, then started cutting away the dark brown seed heads until I had something that looked sort of kind of a little bit like an artichoke:


As a controlled taste-test, I simmered this flower head in lightly salted water until tender.

The result was pretty gross.  A slightly slimey texture, an off-putting, floral taste (duh...)

If anyone out there knows how to prepare sunflower heads, I'm all ears.